

...aimed at educating, promoting good practice and demystifying the use of CodeBook within Architecture.
Wednesday, 22 August 2012


Wednesday, 11 July 2012
It's the little things that count...
Sorry for the rather lengthy delay between posts, it's been a busy few months on many fronts and I've now got to play catchup! There's been a significant amount of development by CBI over the last few months so there's lots to blog about over the next few weeks!
I've just finished putting the latest release of CodeBook (26.05.2012) through it's paces and have been very impressed with some great new functionality and lots of small enhancements that have been made. These little tweaks will save a mouse click here and there, simplify processes and make day to day work just that little bit easier - which is what this post focusses on.
I spoke with Peter about the release and he said that during the last few months they have looked at introducing new "game changing" functionality, such as the mobile tablet version, taking full advantage of the improved Revit API which will now allow CodeBook to generate c-sheets (currently beta testing) but also working through the user-based-wish-list i.e. all those little requests we've been emailing support about.
The first enhancement I came across involves Lookups Editor, which now includes several new Categories that can be edited - Equipment Library Info, Equipment Asset Info and Equipment Asset Data.
![]()
Ever wished you could rename some of the default Equipment Library fieldnames? Well now you can and whilst CodeBook has always been highly customizable, this demonstrates a greater maturity in the userbase and responds to the needs of the different geographic regions using CodeBook.
![]()
Equipment Asset Info and Equipment Asset Data, relate to several areas which also can be renamed - the BIM interface fields, some relate to FF&E positional data and some to the Facilities Management realm - all of which provide the ability to respond to even the most whimsical of client requests!
![]()
One to highlight is the CodeBook Asset guid, which enables each FF&E item within the building to be given a unique asset based identifier which is increasingly being requested on projects. Procurement, assigning barcodes, QR codes, asset tracking and management etc... all rely on this.
Next up is the Revision Editor, which allows you to manage revisions more easily across a project, especially when there is a staggered programme and departments with different revisions to manage.
![]()
Within the Equipment Library it is now possible to provide an Alternative BIM name. Typically you would have single Revit family|Type associated with a single equipment record within the CodeBook Library - but it is now possible to link to multiple families or family types to a single equipment record in CodeBook.
![]()
I think this is aimed at slightly more experienced Revit users and I'd suggest carefully thinking through how you wish to use this. One specific application of this for Health Projects in NSW, Australia would be to link multiple family types of different sizes (e.g. desks) to a single CodeBook equipment record and single HFBS code. The Health Facility Briefing System groups many items under a single code, yet during the user review process when planning and modifying room layouts, different sized desks are specified. So these family types can now all be linked to the same equipment record.
Whether you SHOULD group them together regardless of size is another matter and whether you need to provide a comprehenive schedule should also be considered - the functionality is there, but my advice would be to use sparingly.
Get location using BIM Pick/Hit can be used to find out the coordinate information for a piece of equipment along with the headline data (code, description etc...)
![]()
Once selected in CodeBook, click on the Revit family and the info will appear in a small window.
![]()
There are several enhancements within the Equipment Library - Find Using Query now includes a NOT button, so you can search / filter even more precisely. For example you might want to search *stainless* to get a list of stainless steel benchtops, but you might not want to include those with a lipped edge, so you'd simply type in *lipped* and tick the Not button.
![]()
The equipment library is sorted by equipment code, but there is now an option to switch the sort order to Sort by Description. Which of the two you use is a personal preference, but now you can easily change between them.
![]()
Two questions that I'm often asked are "How can we permanently delete equipment from the library?" and "How do I know if I have duplicate equipment codes?" There are now two functions available that do these tasks, Purge Equipment Library and Ensure equipment codes are unique.
![]()
Both are useful, but should be used sparingly - for example, if you have just hidden several equipment items, give it a week before Purging the Equipment Library. Purging permanently removes the equipment, so if you've hidden an item by mistake you can't get it back (through using the unhide items function).
Two very welcome additions to Project Explorer are Insert New Department and Insert New Floor. In the past you had to close Project Explorer, open the Department or Floor Properties, create the new department or floor, close the properties window and open Project Explorer again. It might seem small, but this will save some to-ing and fro-ing in the early stages of a project.
![]()
Room Editor has some functions that have been revised, Synchronise a (individual) Room and Remove BIM link used to require clicking on the Revit Room that you wanted to synch or remove the link to. Now you don't need to click on the Revit Room.
Show Properties within Room Editor, now expands the room editor window, as opposed to opening a separate properties window. I prefer this format from a workability perspective and it means there is one less window to worry about. You'll also notice from the image below that the Required and Designed equipment are grouped together by code where you have more than one item. You can expand this if you need to carry out a task on a individual item, but again I prefer the format and it means you don't have to count up on screen how many items you have in total.
![]()
Adding, Removing and Substituting equipment items now has the ability to create a list of add/omits/substitutions which can be applied to individual rooms, or all the rooms in a department or all the room in the project. This will certainly help make global modifications a bit easier, but I think the most value will be when making department based changes.
![]()
Update Designed Equipment Lists now has two additional options. Use graphics centroid means that CodeBook will calculate this from the family extents when updating equipment lists, rather than using the origin point specified when you built the family. Also CodeBook can now pickup on the Phase data, should you have equipment placed on multiple project phases.
![]()
There are two major new functions that have been added - Task on Selected Rooms and Set worksets - but these are both quite large topics and deserve a detailed explanation, so I'll cover these in a subsequent post.
So all of that should save you a few clicks per day and hopefully you found the post useful, any requests feel free to email me.
I've just finished putting the latest release of CodeBook (26.05.2012) through it's paces and have been very impressed with some great new functionality and lots of small enhancements that have been made. These little tweaks will save a mouse click here and there, simplify processes and make day to day work just that little bit easier - which is what this post focusses on.
I spoke with Peter about the release and he said that during the last few months they have looked at introducing new "game changing" functionality, such as the mobile tablet version, taking full advantage of the improved Revit API which will now allow CodeBook to generate c-sheets (currently beta testing) but also working through the user-based-wish-list i.e. all those little requests we've been emailing support about.
The first enhancement I came across involves Lookups Editor, which now includes several new Categories that can be edited - Equipment Library Info, Equipment Asset Info and Equipment Asset Data.

Ever wished you could rename some of the default Equipment Library fieldnames? Well now you can and whilst CodeBook has always been highly customizable, this demonstrates a greater maturity in the userbase and responds to the needs of the different geographic regions using CodeBook.

Equipment Asset Info and Equipment Asset Data, relate to several areas which also can be renamed - the BIM interface fields, some relate to FF&E positional data and some to the Facilities Management realm - all of which provide the ability to respond to even the most whimsical of client requests!

One to highlight is the CodeBook Asset guid, which enables each FF&E item within the building to be given a unique asset based identifier which is increasingly being requested on projects. Procurement, assigning barcodes, QR codes, asset tracking and management etc... all rely on this.
Next up is the Revision Editor, which allows you to manage revisions more easily across a project, especially when there is a staggered programme and departments with different revisions to manage.

Within the Equipment Library it is now possible to provide an Alternative BIM name. Typically you would have single Revit family|Type associated with a single equipment record within the CodeBook Library - but it is now possible to link to multiple families or family types to a single equipment record in CodeBook.

I think this is aimed at slightly more experienced Revit users and I'd suggest carefully thinking through how you wish to use this. One specific application of this for Health Projects in NSW, Australia would be to link multiple family types of different sizes (e.g. desks) to a single CodeBook equipment record and single HFBS code. The Health Facility Briefing System groups many items under a single code, yet during the user review process when planning and modifying room layouts, different sized desks are specified. So these family types can now all be linked to the same equipment record.
Whether you SHOULD group them together regardless of size is another matter and whether you need to provide a comprehenive schedule should also be considered - the functionality is there, but my advice would be to use sparingly.
Get location using BIM Pick/Hit can be used to find out the coordinate information for a piece of equipment along with the headline data (code, description etc...)

Once selected in CodeBook, click on the Revit family and the info will appear in a small window.

There are several enhancements within the Equipment Library - Find Using Query now includes a NOT button, so you can search / filter even more precisely. For example you might want to search *stainless* to get a list of stainless steel benchtops, but you might not want to include those with a lipped edge, so you'd simply type in *lipped* and tick the Not button.

The equipment library is sorted by equipment code, but there is now an option to switch the sort order to Sort by Description. Which of the two you use is a personal preference, but now you can easily change between them.

Two questions that I'm often asked are "How can we permanently delete equipment from the library?" and "How do I know if I have duplicate equipment codes?" There are now two functions available that do these tasks, Purge Equipment Library and Ensure equipment codes are unique.

Both are useful, but should be used sparingly - for example, if you have just hidden several equipment items, give it a week before Purging the Equipment Library. Purging permanently removes the equipment, so if you've hidden an item by mistake you can't get it back (through using the unhide items function).
Two very welcome additions to Project Explorer are Insert New Department and Insert New Floor. In the past you had to close Project Explorer, open the Department or Floor Properties, create the new department or floor, close the properties window and open Project Explorer again. It might seem small, but this will save some to-ing and fro-ing in the early stages of a project.

Room Editor has some functions that have been revised, Synchronise a (individual) Room and Remove BIM link used to require clicking on the Revit Room that you wanted to synch or remove the link to. Now you don't need to click on the Revit Room.
Show Properties within Room Editor, now expands the room editor window, as opposed to opening a separate properties window. I prefer this format from a workability perspective and it means there is one less window to worry about. You'll also notice from the image below that the Required and Designed equipment are grouped together by code where you have more than one item. You can expand this if you need to carry out a task on a individual item, but again I prefer the format and it means you don't have to count up on screen how many items you have in total.


Update Designed Equipment Lists now has two additional options. Use graphics centroid means that CodeBook will calculate this from the family extents when updating equipment lists, rather than using the origin point specified when you built the family. Also CodeBook can now pickup on the Phase data, should you have equipment placed on multiple project phases.

There are two major new functions that have been added - Task on Selected Rooms and Set worksets - but these are both quite large topics and deserve a detailed explanation, so I'll cover these in a subsequent post.
So all of that should save you a few clicks per day and hopefully you found the post useful, any requests feel free to email me.
Wednesday, 14 March 2012
Clarity in the sea of BIM complexity
Many CodeBook users gained their experience using CodeBook with 2D software such as AutoCAD, Microstation etc... and making the transition from 'flatland' to BIM not only requires learning new CAD software, it also requires a fundamental shift in thinking and update in how you use CodeBook.
In this post I'll cover some theory, planning principles, standards and technical elements - hopefully addressing some of the questions surrounding how we used to work in CodeBook 2.5D and how we now work in the BIM world.
Historically 'CodeBook Equipment' would consist of blocks/cells that were linked to the CodeBook library database containing the code, description, group, class and numerous other properties.
Stretching items, such as benchtops, would be driven from CodeBook as would equipment fixing heights. Typically you would 'load' all of the equipment @ FFL and specify the fixing height in CodeBook, so that when you created c-sheets, or room elevations, the front or side elevation of equipment would show the bench at the correct height.
This functionality hasn't really changed in CodeBook, but how this works in the BIM environment vs CAD flatland has changed. We no longer load flat graphical repesentations of equipment @ FFL, instead we load 3-dimensional objects @ the correct fix height, so that they instantly look accurate when viewed in elevation or 3D. Additionally, equipment is often stretched directly within the Revit or Archicad interface by updating parameters / properties.
So what does this mean from a CodeBook perspective? Well, we should still correctly define this information within CodeBook, however the control of these parameters/properties may be driven by the BIM platform and so we need to consider this in how we create our family/GDL objects and also map the fields in CodeBook to the corresponding parameter/properties.
Taking the example of a benchtop, generally you'll have a set number of types based on material, depth and thickness, but the fix height and width will vary from room to room. Within the Revit family, you'll draw an extrusion of the size / shape you require and enable the control of the width (image_1) and fix height (image_2) through assigning a parameter to a dimension and locking to a reference plane.
image_1

image_2

Recording / controlling these correctly in CodeBook requires mapping these equipment parameters within the project properties > administrator > cad and bim settings (image_3), plus project properties > administrator > define parameter mapping > equipment parameter mapping (image_4)
image_3

image_4

Configuring and mapping this data ensures that when you link equipment graphics in your library and also update designed equipment from your project, the correct values are recorded within CodeBook. There is another consideration you need to make - do you want to report the stretched size, or default size? In order to report the stretch size, you need to tick the checkbox 'output the sizes of items or stretched sizes from bim to reports' under Equipment library > Details > Options (image_5)
image_5

You can control fixing heights through CodeBook, by defining the fix height value in the CodeBook library, constructing your Revit family so that the fix height parameter is locked to the reference plane (top of bench) and mapping this parameter in CodeBook as described above. It is also possible (and perhaps more common practice) to control this in Revit, in which case you should select to 'place equipment blocks with a z height of zero' - which means that the fix height is determined by what you've defined in your Revit family.
Think about it this way - specify the fix height in your Revit family by locking the parameter to the reference plane, specify the fix height value in Revit and tick the 'place equipment block with a z height of zero'. CodeBook then ignores the value it has in the CodeBook Library and uses the default value you've specified in your family.
If you lock the parameter to the reference plane and specify the fix height to be zero in your family, leave the 'place equipment block with a z height of zero' unticked and CodeBook will insert the family using the fix height specified in your CodeBook library.
Controlling such parameters through CodeBook or directly in the BIM platform is a decision each practice needs to make individually - CodeBook can work with this whichever you choose.
Utilizing family types, graphical visibility options and the ability to stretch equipment are all technical Revit family options readily available. Practical considerations relating to modular sized items, construction and procurement though are often forgotten in the sea of BIM complexity. Just because you can embed complex functionality within your Revit families, doesn't necessarily mean that you should.
A classic example of this relates to cabinetry - you could create an adaptive Revit family that allows you to freely adjust the size, shape, material, shelving etc... but this freedom doesn't take into account key construction considerations. Building contractors and cabinet manufacturers will not want to custom make every cupboard on site, rather they will have a stock set of modular sizes they will use and so discreet family types based on these modular sizes is generally the preferred option.
When handing over a BIM model to the client, there is a requirement to have order and structure within the model, so that the procurement, fabrication and installation of equipment and furniture can be managed effectively. This is partly covered by IFC standards and partly by COBie, but the fundamental question you should be asking yourself is what do we need to design, how is it constructed and whether the item in question is a prefabricated modular item that should be based on what is available in the marketplace?
Having FF&E practice standards, based on building code compliance and market availability are where synergies across projects, studios or even geographic regions are gained - which ultimately lead to fewer defects, RFI's and greater profit on jobs.
Clarity of thought, for where Design and Innovation in best focussed and should be applied to projects is common sense that is not always common knowledge.
Understanding the downstream requirements of the contractor and client are considerations that need to be applied during the design phase, software doesn't do this for you. The "BIM enlightened" integrate these considerations early on, so that software can make the documentation and scheduling of complex building easier.
Make it happen...
In this post I'll cover some theory, planning principles, standards and technical elements - hopefully addressing some of the questions surrounding how we used to work in CodeBook 2.5D and how we now work in the BIM world.
Historically 'CodeBook Equipment' would consist of blocks/cells that were linked to the CodeBook library database containing the code, description, group, class and numerous other properties.
Stretching items, such as benchtops, would be driven from CodeBook as would equipment fixing heights. Typically you would 'load' all of the equipment @ FFL and specify the fixing height in CodeBook, so that when you created c-sheets, or room elevations, the front or side elevation of equipment would show the bench at the correct height.
This functionality hasn't really changed in CodeBook, but how this works in the BIM environment vs CAD flatland has changed. We no longer load flat graphical repesentations of equipment @ FFL, instead we load 3-dimensional objects @ the correct fix height, so that they instantly look accurate when viewed in elevation or 3D. Additionally, equipment is often stretched directly within the Revit or Archicad interface by updating parameters / properties.
So what does this mean from a CodeBook perspective? Well, we should still correctly define this information within CodeBook, however the control of these parameters/properties may be driven by the BIM platform and so we need to consider this in how we create our family/GDL objects and also map the fields in CodeBook to the corresponding parameter/properties.
Taking the example of a benchtop, generally you'll have a set number of types based on material, depth and thickness, but the fix height and width will vary from room to room. Within the Revit family, you'll draw an extrusion of the size / shape you require and enable the control of the width (image_1) and fix height (image_2) through assigning a parameter to a dimension and locking to a reference plane.
image_1

image_2

Recording / controlling these correctly in CodeBook requires mapping these equipment parameters within the project properties > administrator > cad and bim settings (image_3), plus project properties > administrator > define parameter mapping > equipment parameter mapping (image_4)
image_3

image_4

Configuring and mapping this data ensures that when you link equipment graphics in your library and also update designed equipment from your project, the correct values are recorded within CodeBook. There is another consideration you need to make - do you want to report the stretched size, or default size? In order to report the stretch size, you need to tick the checkbox 'output the sizes of items or stretched sizes from bim to reports' under Equipment library > Details > Options (image_5)
image_5

You can control fixing heights through CodeBook, by defining the fix height value in the CodeBook library, constructing your Revit family so that the fix height parameter is locked to the reference plane (top of bench) and mapping this parameter in CodeBook as described above. It is also possible (and perhaps more common practice) to control this in Revit, in which case you should select to 'place equipment blocks with a z height of zero' - which means that the fix height is determined by what you've defined in your Revit family.
Think about it this way - specify the fix height in your Revit family by locking the parameter to the reference plane, specify the fix height value in Revit and tick the 'place equipment block with a z height of zero'. CodeBook then ignores the value it has in the CodeBook Library and uses the default value you've specified in your family.
If you lock the parameter to the reference plane and specify the fix height to be zero in your family, leave the 'place equipment block with a z height of zero' unticked and CodeBook will insert the family using the fix height specified in your CodeBook library.
Controlling such parameters through CodeBook or directly in the BIM platform is a decision each practice needs to make individually - CodeBook can work with this whichever you choose.
Utilizing family types, graphical visibility options and the ability to stretch equipment are all technical Revit family options readily available. Practical considerations relating to modular sized items, construction and procurement though are often forgotten in the sea of BIM complexity. Just because you can embed complex functionality within your Revit families, doesn't necessarily mean that you should.
A classic example of this relates to cabinetry - you could create an adaptive Revit family that allows you to freely adjust the size, shape, material, shelving etc... but this freedom doesn't take into account key construction considerations. Building contractors and cabinet manufacturers will not want to custom make every cupboard on site, rather they will have a stock set of modular sizes they will use and so discreet family types based on these modular sizes is generally the preferred option.
When handing over a BIM model to the client, there is a requirement to have order and structure within the model, so that the procurement, fabrication and installation of equipment and furniture can be managed effectively. This is partly covered by IFC standards and partly by COBie, but the fundamental question you should be asking yourself is what do we need to design, how is it constructed and whether the item in question is a prefabricated modular item that should be based on what is available in the marketplace?
Having FF&E practice standards, based on building code compliance and market availability are where synergies across projects, studios or even geographic regions are gained - which ultimately lead to fewer defects, RFI's and greater profit on jobs.
Clarity of thought, for where Design and Innovation in best focussed and should be applied to projects is common sense that is not always common knowledge.
Understanding the downstream requirements of the contractor and client are considerations that need to be applied during the design phase, software doesn't do this for you. The "BIM enlightened" integrate these considerations early on, so that software can make the documentation and scheduling of complex building easier.
Make it happen...
Thursday, 23 February 2012
The CAD hangover vs BIM karma
I'm quite lucky really... I work in a highly creative environment, with thought leaders, technical innovators and have a boss who really understands BIM, whilst allowing me the freedom to look at how we can do it better.
BIM implementation is largely a cultural thing in my opinion - back in the "good ol CAD drafting days" people focused exclusively on the plan, detail or section they were producing that day. BIM karma forces us to consider how we build it and what the guy sat nextdoor is working on tomorrow?
In the "flatland" 2D CAD days, we documented things in a prosaic, manually intensive way, trying desperately to coordinate drawings, packages - invariably with little recognition from clients of the effort required to make this happen.
In 2012, we have the tools available to automate these historic pipe dreams and get technology to work for us... for a change. Some of these tools have been around for a while, but generally by exception rather than as a rule.
CodeBook is a highly detailed program and when combined with Revit it can provide miraculous results - BUT - there are some basics that are often overlooked in the new world of BIM complexity.
Understanding what information you already have available to you, not re-inventing the wheel and making the most of that data is regularly forgotten when creating deliverables and "getting drawings out."
I'm an ardent believer in NOT duplicating information, but knowing how to extract and how to make the best use of the data available, in the right medium, is a skill that often comes with a high premium.
Going back to grass roots, reminding you of what you may already know and the information already available to you is the purpose of this "serendipity-esq" post.
Room information and room data stored within your CodeBook database is ready and waiting for you to utilisse within the CodeBook Reports. Most people know what is contained within a Room Data Sheet, but may not realise that this information can be pushed into your BIM model, or extracted through a report.
A room data sheet typically consists of:
_design data - the function of the room, the occupancy, hours of operation etc...
_finishes - floor, wall, ceiling, doors, internal glazing etc...
_environmental conditions - temperature, HVAC, hepa filtration, lighting lux levels, UPS, etc...
_equipment - furniture, equipment and services
...and whilst we report these conclusively in a Room Data Sheet, they can be extracted individually for architectural reasons and to aid in coordination with other disciplines.
The CodeBook reporting function has a number of pre-defined reports, but also several that can be configured or customised to provide whatever you may need through the report settings.
For example, if you wanted to extract the acoustic data, floor finishes, or lighting lux levels to send to a consultant for coordination - you can create a Room Data (xls) report specific to that data.
The way you do this is to select a Room Data (xls) report and in the report settings pick (through tick boxes) the information you require. These are categorised in sections - Room Information, Design, Finishes, Equipment and M+E - first you choose which section you require and then select the fields within these Categories that you wish to report.
For example = choose the Design section and tick the box for Occupancy - CodeBook will produce a report restricted to that information, which can then be emailed to the Services Engineer for checking.

An alternative to excel is to map this data in CodeBook to a corresponding Revit Room Parameter and provide the Services Engineer with a colour scheme drawing that shows each rooms Occupancy values by colour.
In practice you may wish to choose more data than this to send to your services consultant, but individual parameters may be useful, especially when represented in the context of the building through a colour themed view.
The "BIM karma" mentality involves recording information correctly once and then utilising it many scenarios.
Make it happen.
BIM implementation is largely a cultural thing in my opinion - back in the "good ol CAD drafting days" people focused exclusively on the plan, detail or section they were producing that day. BIM karma forces us to consider how we build it and what the guy sat nextdoor is working on tomorrow?
In the "flatland" 2D CAD days, we documented things in a prosaic, manually intensive way, trying desperately to coordinate drawings, packages - invariably with little recognition from clients of the effort required to make this happen.
In 2012, we have the tools available to automate these historic pipe dreams and get technology to work for us... for a change. Some of these tools have been around for a while, but generally by exception rather than as a rule.
CodeBook is a highly detailed program and when combined with Revit it can provide miraculous results - BUT - there are some basics that are often overlooked in the new world of BIM complexity.
Understanding what information you already have available to you, not re-inventing the wheel and making the most of that data is regularly forgotten when creating deliverables and "getting drawings out."
I'm an ardent believer in NOT duplicating information, but knowing how to extract and how to make the best use of the data available, in the right medium, is a skill that often comes with a high premium.
Going back to grass roots, reminding you of what you may already know and the information already available to you is the purpose of this "serendipity-esq" post.
Room information and room data stored within your CodeBook database is ready and waiting for you to utilisse within the CodeBook Reports. Most people know what is contained within a Room Data Sheet, but may not realise that this information can be pushed into your BIM model, or extracted through a report.
A room data sheet typically consists of:
_design data - the function of the room, the occupancy, hours of operation etc...
_finishes - floor, wall, ceiling, doors, internal glazing etc...
_environmental conditions - temperature, HVAC, hepa filtration, lighting lux levels, UPS, etc...
_equipment - furniture, equipment and services
...and whilst we report these conclusively in a Room Data Sheet, they can be extracted individually for architectural reasons and to aid in coordination with other disciplines.
The CodeBook reporting function has a number of pre-defined reports, but also several that can be configured or customised to provide whatever you may need through the report settings.
For example, if you wanted to extract the acoustic data, floor finishes, or lighting lux levels to send to a consultant for coordination - you can create a Room Data (xls) report specific to that data.
The way you do this is to select a Room Data (xls) report and in the report settings pick (through tick boxes) the information you require. These are categorised in sections - Room Information, Design, Finishes, Equipment and M+E - first you choose which section you require and then select the fields within these Categories that you wish to report.
For example = choose the Design section and tick the box for Occupancy - CodeBook will produce a report restricted to that information, which can then be emailed to the Services Engineer for checking.

An alternative to excel is to map this data in CodeBook to a corresponding Revit Room Parameter and provide the Services Engineer with a colour scheme drawing that shows each rooms Occupancy values by colour.
In practice you may wish to choose more data than this to send to your services consultant, but individual parameters may be useful, especially when represented in the context of the building through a colour themed view.
The "BIM karma" mentality involves recording information correctly once and then utilising it many scenarios.
Make it happen.
Wednesday, 15 February 2012
Spread the love - system and shared parameters
It's been a couple of months since I last posted... Christmas, New Years, getting engaged, having a baby and Tet (Chinese/Vietnamese new year) are some of my own highlights, I hope y'all had an enjoyable break!
I'm going to start by making a prediction for 2012 - it's going to be a big year for the "I" in BIM, which stands for Information or Interoperability depending on your perspective.
CodeBook 'System' Parameters are those essential for CodeBook to function with Revit, CodeBook 'Shared' Parameters are those which are user defined optional parameters relating to either room or equipment data that you want to include within your Revit model.
Many large practices use a Shared Parameters File (SPF) to predefine the key parameters important to the modelling and documentation of each project. The idea being that you define them once correctly in your SPF and then utilize them on each project - think title block info, common building element, family and view properties.
Let's start with the CodeBook System Parameters, which I've defined in the image below
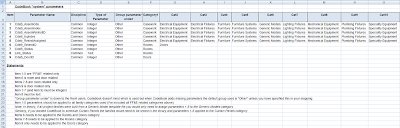
...these need to be explicitly defined in your Shared Parameters File as above - or you can allow CodeBook to add these to your project by choosing NOT to tick 'Do not create missing shared parameters' see image below. Apologies for the double negatives, but make sure you get it right or you'll have issues when you synchronise rooms, or update designed equipment.

We have chosen to control all parameters and define them through our SPF, hence why this BOX IS TICKED in the image.
The CodeBook Shared Parameters are optional and you can choose to include as many, or as few as you like. The image below shows an example of the CodeBook room information and room data fields we have chosen to 'share' in one of our projects.

The columns on the left hand side indicate the CodeBook fields, the Parameter Group and Parameter Name fields relate to (in this case) the Revit Room Parameters that we wish to 'Share' between CodeBook and Revit. Once you have mapped these, you need to determine which direction the data will be exchanged.
Generally speaking it is advisable to push or publish these parameters from CodeBook into Revit by selecting Copy data TO BIM. Typically you will define room data in CodeBook long before your Revit model is developed sufficiently to include in your model - i.e. your room data sheet info such as room name, required area, floor finish etc... are created in CodeBook during the briefing phase and it is only during the schematic design or design development phase that you would look to link this information with the Revit model.
Once your parameters are mapped, you've chosen the direction in which the data will be exchanged and selected which to 'Include' you are ready to Synchronise BIM to database links. Every time you Synchronise, CodeBook will record the geometric and coordinate data of each room from Revit into CodeBook - PLUS - dependant on what you've defined in your parameter mapping CodeBook will publish room data into the Revit Room Parameters. Note: the direction is critical, if you select Copy Data TO BIM, information will flow from CodeBook into Revit. If you select to Copy Data FROM BIM, the values within your Revit Room Parameters will be copied into the CodeBook fields.
Hopefully this all makes logical sense, but to fully get the point across, let's take the example of room names. If you have room names populated within CodeBook, but not in your Revit model, you would select to Copy Data TO BIM. When you synchronise BIM to database links CodeBook will record area, perimeter etc... from Revit into CodeBook and populate the Room Name Parameter field in Revit with the values defined in your CodeBook project. If you selected to Copy Data FROM BIM (and the Revit Room Name Parameter was empty) you would end up with a CodeBook project full of empty room names.
So to recap, the CodeBook 'System' Parameters are essential for CodeBook and Revit to work together, generally you should allow CodeBook to manage this by leaving 'Do not create missing shared parameters' UNTICKED. If you have defined these in your SPF then you can tick this box - but make sure you get it correct!
The CodeBook 'Shared' Parameters are optional and you define them in the parameter mapping. Specify the data you want to exchange between CodeBook and Revit and the direction - CodeBook to Revit, or Revit to CodeBook. When you Synchronise BIM to database links, the geometry and locational coordinate data will be recorded from Revit into CodeBook AND the parameters you've 'Included' within your parameter mapping will also be synchronised.
Also within Project Parameters > Define Parameter mapping, you'll notice you that you can define parameters for equipment and doors. The same principle applies in that you specify the CodeBook data and map this to a corresponding Revit Parameter. Door parameters can be exchanged in either direction, but equipment parameters can only be synchronised from CodeBook to Revit.
The reason for having a single directional data flow for equipment families, is due to the 'data relationship type' being one to many. Each equipment family should have the same code, description, group etc... but it is possible to have different instance values for these in your Revit model, if the values were entered manually. There is a single record in the CodeBook library for each item of equipments code, description, group etc... therefore you can only publish these parameters from CodeBook to Revit.
Again to fully explain this at length, let's take the example of equipment codes. If you had a family within Revit with multiple different parameter values for the equipment code and CodeBook allowed you to exchange data from Revit to CodeBook, how would CodeBook know which was correct? WE DEFINITELY WANT these to be consistent for each family type, hence why the data flow for equipment is one directional.
Hopefully this has explained CodeBook System and Shared parameters fully, but if in doubt, contact CodeBook support who will be sure to point you in the right direction.
Happy CodeBooking!
I'm going to start by making a prediction for 2012 - it's going to be a big year for the "I" in BIM, which stands for Information or Interoperability depending on your perspective.
CodeBook 'System' Parameters are those essential for CodeBook to function with Revit, CodeBook 'Shared' Parameters are those which are user defined optional parameters relating to either room or equipment data that you want to include within your Revit model.
Many large practices use a Shared Parameters File (SPF) to predefine the key parameters important to the modelling and documentation of each project. The idea being that you define them once correctly in your SPF and then utilize them on each project - think title block info, common building element, family and view properties.
Let's start with the CodeBook System Parameters, which I've defined in the image below
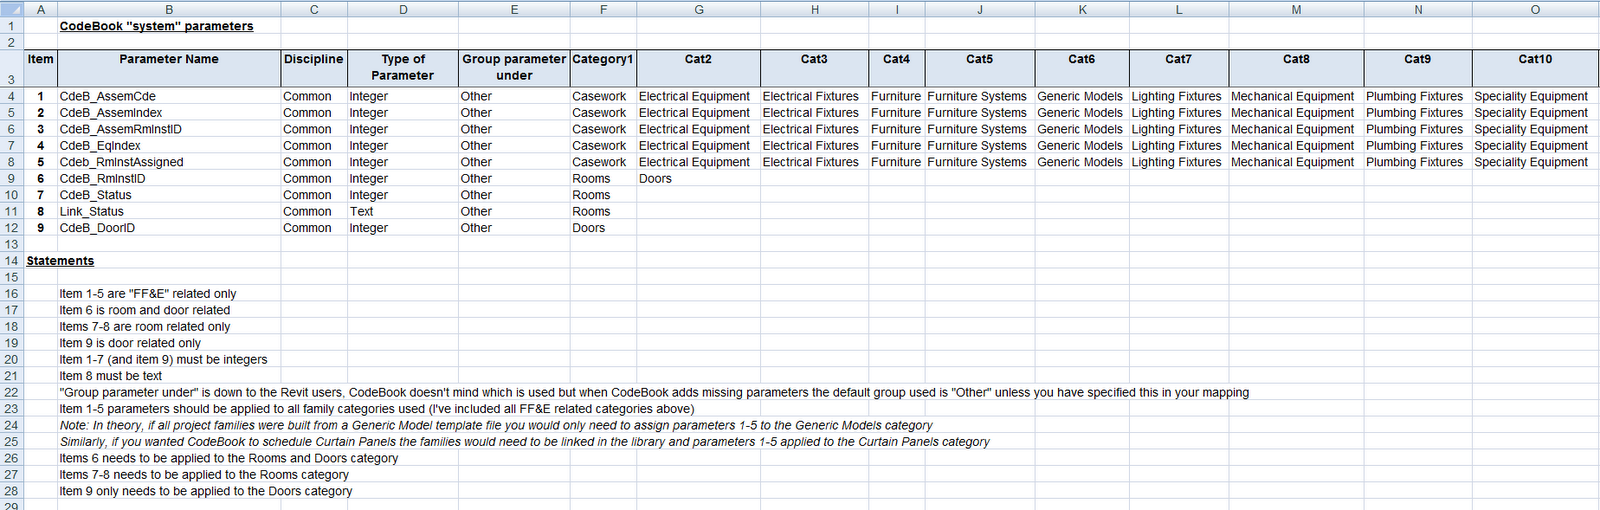
...these need to be explicitly defined in your Shared Parameters File as above - or you can allow CodeBook to add these to your project by choosing NOT to tick 'Do not create missing shared parameters' see image below. Apologies for the double negatives, but make sure you get it right or you'll have issues when you synchronise rooms, or update designed equipment.

We have chosen to control all parameters and define them through our SPF, hence why this BOX IS TICKED in the image.
The CodeBook Shared Parameters are optional and you can choose to include as many, or as few as you like. The image below shows an example of the CodeBook room information and room data fields we have chosen to 'share' in one of our projects.

The columns on the left hand side indicate the CodeBook fields, the Parameter Group and Parameter Name fields relate to (in this case) the Revit Room Parameters that we wish to 'Share' between CodeBook and Revit. Once you have mapped these, you need to determine which direction the data will be exchanged.
Generally speaking it is advisable to push or publish these parameters from CodeBook into Revit by selecting Copy data TO BIM. Typically you will define room data in CodeBook long before your Revit model is developed sufficiently to include in your model - i.e. your room data sheet info such as room name, required area, floor finish etc... are created in CodeBook during the briefing phase and it is only during the schematic design or design development phase that you would look to link this information with the Revit model.
Once your parameters are mapped, you've chosen the direction in which the data will be exchanged and selected which to 'Include' you are ready to Synchronise BIM to database links. Every time you Synchronise, CodeBook will record the geometric and coordinate data of each room from Revit into CodeBook - PLUS - dependant on what you've defined in your parameter mapping CodeBook will publish room data into the Revit Room Parameters. Note: the direction is critical, if you select Copy Data TO BIM, information will flow from CodeBook into Revit. If you select to Copy Data FROM BIM, the values within your Revit Room Parameters will be copied into the CodeBook fields.
Hopefully this all makes logical sense, but to fully get the point across, let's take the example of room names. If you have room names populated within CodeBook, but not in your Revit model, you would select to Copy Data TO BIM. When you synchronise BIM to database links CodeBook will record area, perimeter etc... from Revit into CodeBook and populate the Room Name Parameter field in Revit with the values defined in your CodeBook project. If you selected to Copy Data FROM BIM (and the Revit Room Name Parameter was empty) you would end up with a CodeBook project full of empty room names.
So to recap, the CodeBook 'System' Parameters are essential for CodeBook and Revit to work together, generally you should allow CodeBook to manage this by leaving 'Do not create missing shared parameters' UNTICKED. If you have defined these in your SPF then you can tick this box - but make sure you get it correct!
The CodeBook 'Shared' Parameters are optional and you define them in the parameter mapping. Specify the data you want to exchange between CodeBook and Revit and the direction - CodeBook to Revit, or Revit to CodeBook. When you Synchronise BIM to database links, the geometry and locational coordinate data will be recorded from Revit into CodeBook AND the parameters you've 'Included' within your parameter mapping will also be synchronised.
Also within Project Parameters > Define Parameter mapping, you'll notice you that you can define parameters for equipment and doors. The same principle applies in that you specify the CodeBook data and map this to a corresponding Revit Parameter. Door parameters can be exchanged in either direction, but equipment parameters can only be synchronised from CodeBook to Revit.
The reason for having a single directional data flow for equipment families, is due to the 'data relationship type' being one to many. Each equipment family should have the same code, description, group etc... but it is possible to have different instance values for these in your Revit model, if the values were entered manually. There is a single record in the CodeBook library for each item of equipments code, description, group etc... therefore you can only publish these parameters from CodeBook to Revit.
Again to fully explain this at length, let's take the example of equipment codes. If you had a family within Revit with multiple different parameter values for the equipment code and CodeBook allowed you to exchange data from Revit to CodeBook, how would CodeBook know which was correct? WE DEFINITELY WANT these to be consistent for each family type, hence why the data flow for equipment is one directional.
Hopefully this has explained CodeBook System and Shared parameters fully, but if in doubt, contact CodeBook support who will be sure to point you in the right direction.
Happy CodeBooking!
Monday, 28 November 2011
Content is King!
Downloading free Revit families vs. buying stock families vs. modelling your own is under constant debate within most practices. Personally I think there is room for each, but before using any family within a project - you should take time to understand what it contains and what LOD it has been modelled to.
The 'grey hairs' are often misled into thinking there is a sea of free families out there, perfectly modelled that will insert themselves directly into a project. As Steve points out in his post (below), it's still the wild west out there...
http://revitoped.blogspot.com/2011/11/content-critique.html
The 'grey hairs' are often misled into thinking there is a sea of free families out there, perfectly modelled that will insert themselves directly into a project. As Steve points out in his post (below), it's still the wild west out there...
http://revitoped.blogspot.com/2011/11/content-critique.html
Sunday, 20 November 2011
CodeBook v10 - sneak peak!
The Revit Application Programming Interface (API) has been somewhat restrictive in recent years and whilst it is still not as "open" as many developers would like, it is significantly better now than it was 5 years ago when the first incarnation of CodeBook for Revit was unveiled.
CodeBook International's (CBI) development focus during the past 12 months has been to refine and optimize core functionality for Revit, enhance reporting and improve interoperability with 4, 5 and 6D systems. CodeBook also has a SQL server version and as one of the users involved in the beta testing for v10, I'm very excited about the official release!
CodeBook International have been increasing their global presence during the last few years and alongside releasing v10, CBI have a fresh new website, re-juvenated brand and clearer definition about what CodeBook is and how it's used by designers, construction companies and building owners

So you may have already seen some of the new functions and utilized them in your projects through a beta, however, there have been over 100 enhancements, tweeks, or new functions added in 2011 alone. For a full list review CIS-003 when you upgrade - but in the meantime below is a summary of the major updates:
 CodeBook Interface:
_Equipment ID range extended
(10,000-79,000)
_Import equipment from another Library
_Add 6 Assemblies to Room Types
_Omit, remove & replace multiple equipment
Interoperability:
_Maximo integration enhanced
_HFBS import enhanced
_ESRI export
_Export to COBie
Reporting:
_FF&E reports added
_Flex custom report system introduced
_Word reports also export a pdf
Revit interface:
_Assign family to a room
_Edit / delete parameters
_Nested family parameters updated
_Link Doors in separate model to rooms
_CB shared params always added
...and last but by no means least CodeBook shuttle is back which deserves a separate post.
There are a few functions that I think will be very useful, so here's a bit more info on them:
Troubleshooting Room links is accessed through the Revit Add-ins menu>Build>Troubleshoot and this allows you to put a marker into the rooms identifying which are linked, duplicates and unlinked rooms. You can also unlink all duplicates, which is sometimes easier than working out which is correct and you can also remove "phantom" rooms (not placed rooms).
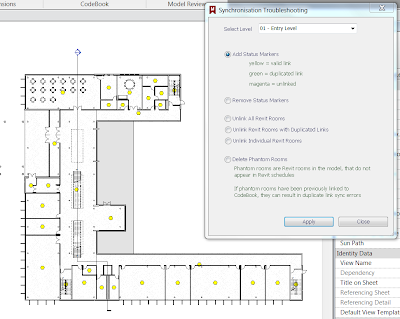
Updating the value for a parameter en-masse is now possible and you can also delete a parameter from your project. Whilst this can be a very useful tool, take some time to double check what you are doing so that you don't overwrite or delete data that is in use.

When updating from the BIM model, CodeBook will also now place a red marker and generate a text file to list out the families that are not being reported (i.e. inside a room). This is a hugely valuable tool and knowing unequivically which items are not being reported immediately after updating will save lots of time.

In the case of items falling outside a room, that should be reported, for example a window blind there is now the function to assign these to a room. I know this has been high on people's wish list for some time.

So that gives you a taster of what to expect from CodeBook version 10 when it is officially released, which I believe will be in the next fortnight, to coincide with this years Autodesk University.
CodeBook International's (CBI) development focus during the past 12 months has been to refine and optimize core functionality for Revit, enhance reporting and improve interoperability with 4, 5 and 6D systems. CodeBook also has a SQL server version and as one of the users involved in the beta testing for v10, I'm very excited about the official release!
CodeBook International have been increasing their global presence during the last few years and alongside releasing v10, CBI have a fresh new website, re-juvenated brand and clearer definition about what CodeBook is and how it's used by designers, construction companies and building owners

So you may have already seen some of the new functions and utilized them in your projects through a beta, however, there have been over 100 enhancements, tweeks, or new functions added in 2011 alone. For a full list review CIS-003 when you upgrade - but in the meantime below is a summary of the major updates:

_Equipment ID range extended
(10,000-79,000)
_Import equipment from another Library
_Add 6 Assemblies to Room Types
_Omit, remove & replace multiple equipment
Interoperability:
_Maximo integration enhanced
_HFBS import enhanced
_ESRI export
_Export to COBie
Reporting:
_FF&E reports added
_Flex custom report system introduced
_Word reports also export a pdf
Revit interface:
_Assign family to a room
_Edit / delete parameters
_Nested family parameters updated
_Link Doors in separate model to rooms
_CB shared params always added
...and last but by no means least CodeBook shuttle is back which deserves a separate post.
There are a few functions that I think will be very useful, so here's a bit more info on them:
Troubleshooting Room links is accessed through the Revit Add-ins menu>Build>Troubleshoot and this allows you to put a marker into the rooms identifying which are linked, duplicates and unlinked rooms. You can also unlink all duplicates, which is sometimes easier than working out which is correct and you can also remove "phantom" rooms (not placed rooms).
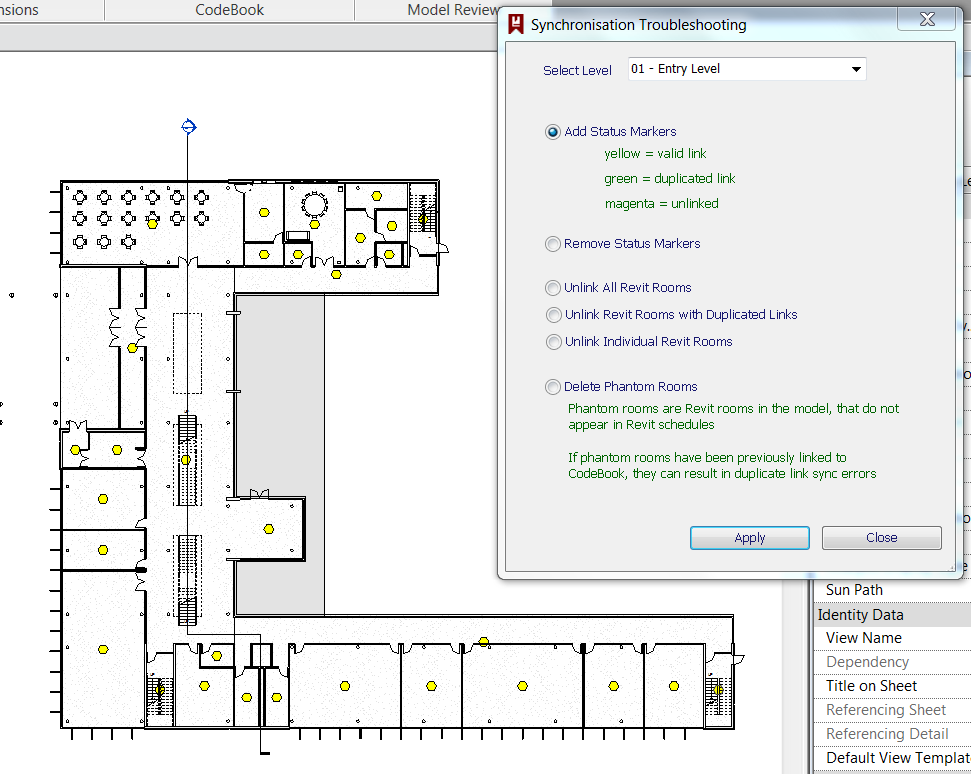
Updating the value for a parameter en-masse is now possible and you can also delete a parameter from your project. Whilst this can be a very useful tool, take some time to double check what you are doing so that you don't overwrite or delete data that is in use.

When updating from the BIM model, CodeBook will also now place a red marker and generate a text file to list out the families that are not being reported (i.e. inside a room). This is a hugely valuable tool and knowing unequivically which items are not being reported immediately after updating will save lots of time.

In the case of items falling outside a room, that should be reported, for example a window blind there is now the function to assign these to a room. I know this has been high on people's wish list for some time.

So that gives you a taster of what to expect from CodeBook version 10 when it is officially released, which I believe will be in the next fortnight, to coincide with this years Autodesk University.
Subscribe to:
Posts (Atom)